
The Raspberry Pi, a versatile single-board computer, has opened up a world of possibilities for hobbyists, makers, and developers alike. One of the many exciting applications of this tiny powerhouse is the ability to integrate various sensors, including light sensors, to create interactive and responsive projects. In this article, we’ll explore the concept of using a Light Dependent Resistor (LDR) as a light sensor with a Raspberry Pi, covering everything from the fundamental principles to practical implementations.
Understanding Light Dependent Resistors (LDRs)
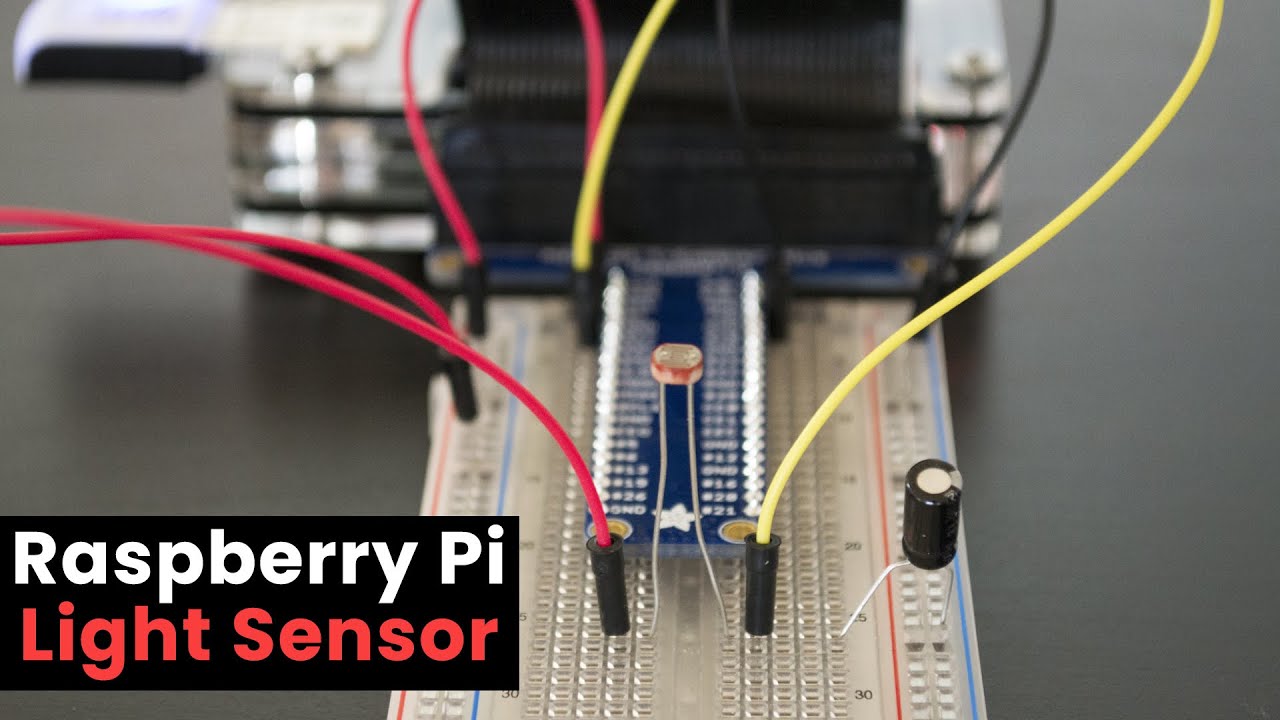
An LDR, also known as a photoresistor, is a simple yet powerful electronic component that changes its resistance based on the amount of light it receives. When exposed to bright light, the resistance of the LDR decreases, allowing more current to flow through it. Conversely, in low light conditions, the resistance increases, limiting the current flow.
Key Features of LDRs:
- Inexpensive and readily available
- Sensitive to a wide range of light intensities
- Versatile and easy to integrate with various electronic circuits
- Suitable for numerous applications, including light meters, automatic lighting systems, and sensor-based projects
Connecting an LDR to a Raspberry Pi
To integrate an LDR with your Raspberry Pi, you’ll need a few additional components:
- Breadboard
- Jumper wires
- Resistor (typically around 10kΩ)
- Analog-to-Digital Converter (ADC) module (if your Raspberry Pi doesn’t have an analog input)
The circuit setup is relatively straightforward:
- Connect the LDR and resistor in series: One leg of the LDR should be connected to the Raspberry Pi’s GPIO pin (or the ADC module’s input), and the other leg should be connected to one end of the resistor. The remaining end of the resistor should be connected to ground.
- Power the circuit: Connect the positive voltage supply (typically 3.3V or 5V) to the junction between the LDR and the resistor.
- Enable pull-up/pull-down resistor (optional): Depending on your specific setup, you may need to enable the internal pull-up or pull-down resistor on the Raspberry Pi’s GPIO pin to ensure stable readings.
- Write code to read the sensor data: Use Python or your preferred programming language to read the analog input value from the GPIO pin (or ADC module) and convert it to a meaningful light intensity value.
Real-World Applications
The combination of a Raspberry Pi and an LDR opens up a myriad of exciting project possibilities. Here are a few examples:
- Automatic Lighting Control: Integrate the LDR sensor into a home automation system to automatically turn on/off lights based on ambient light levels, saving energy and providing convenience.
- Light Meters: Build a digital light meter that displays the light intensity in real-time, useful for photography, horticulture, or any application where precise light measurement is required.
- Night Lights and Sensor Lamps: Create sensor-controlled night lights or lamps that automatically turn on when it gets dark, providing a practical and energy-efficient lighting solution.
- Environmental Monitoring: Incorporate the LDR into a broader environmental monitoring system, tracking light levels alongside other factors like temperature, humidity, and air quality.
- Interactive Art Installations: Leverage the LDR sensor to create dynamic and responsive art installations that react to changes in light, creating captivating and immersive experiences.
Best Practices and Considerations
When working with LDR sensors and the Raspberry Pi, it’s essential to follow best practices to ensure reliable and accurate results:
- Proper Calibration: LDRs can exhibit variations in their sensitivity and response curves. Calibrate your sensor by measuring known light levels and adjusting your code accordingly.
- Noise Reduction: Implement techniques like averaging multiple readings or using capacitors to filter out electrical noise, which can impact the accuracy of your measurements.
- Environmental Factors: Consider external factors like temperature and humidity, as they can influence the performance of LDRs. Compensate for these factors in your code or enclosure design.
- Power Management: Optimize your code and hardware setup to minimize power consumption, especially for battery-powered or portable projects.
- Enclosure Design: Carefully design the enclosure for your project, ensuring that the LDR is properly exposed to the desired light source while protecting it from unwanted external influences.
Key Takeaways
- LDRs (Light Dependent Resistors) are versatile and inexpensive light sensors that can be easily integrated with a Raspberry Pi.
- By connecting an LDR to the Raspberry Pi’s GPIO pins (or an ADC module), you can create projects that respond to changes in light intensity.
- Real-world applications range from automatic lighting control and light meters to interactive art installations and environmental monitoring systems.
- Follow best practices, such as proper calibration, noise reduction, and enclosure design, to ensure reliable and accurate results.
- Leverage the power of the Raspberry Pi and LDRs to unlock endless possibilities for DIY projects and automation solutions.
Conclusion
The combination of the Raspberry Pi and an LDR light sensor opens up a world of possibilities for creating interactive and responsive projects. Whether you’re a hobbyist, maker, or developer, this powerful duo empowers you to explore diverse applications, from home automation to environmental monitoring and beyond. By following the guidelines and best practices outlined in this article, you can harness the full potential of LDRs and bring your innovative ideas to life. Embrace the endless possibilities and let your creativity shine through your Raspberry Pi and LDR-powered projects.
FAQs
- What is the purpose of using a resistor in series with the LDR?
The resistor in series with the LDR forms a voltage divider circuit. As the resistance of the LDR changes with light intensity, the voltage across the resistor also changes, allowing the Raspberry Pi to measure the light level.
- Can I use an LDR with a Raspberry Pi without an ADC module?
While it is possible to use an LDR directly with the Raspberry Pi’s GPIO pins, the accuracy and resolution may be limited. An ADC module provides better analog-to-digital conversion, resulting in more precise light intensity measurements.
- How do I calibrate the LDR sensor for accurate readings?
To calibrate the LDR sensor, you can expose it to known light levels (e.g., complete darkness, bright sunlight) and adjust the code accordingly to map the sensor readings to the corresponding light intensities.
- Can LDRs be used for detecting specific wavelengths of light?
While LDRs are generally sensitive to a broad range of visible light, their sensitivity can vary slightly across different wavelengths. For applications requiring precise wavelength detection, specialized light sensors or filters may be needed.
- What are some common sources of noise or interference when using LDRs?
Electrical noise from nearby electronics, ambient light fluctuations, and temperature variations can all introduce noise or interference in LDR readings. Proper shielding, filtering, and compensation techniques should be employed to mitigate these issues.
- How can I protect the LDR from environmental factors like humidity or dust?
To protect the LDR from environmental factors, you can encapsulate it in a sealed enclosure with a transparent cover or lens. This will prevent moisture, dust, or other contaminants from affecting its performance.
- Can LDRs be used for indoor and outdoor projects?
Yes, LDRs can be used for both indoor and outdoor projects. However, outdoor projects may require additional protection from environmental factors like weather, temperature extremes, and direct sunlight exposure.
- What is the typical power consumption of an LDR circuit?
The power consumption of an LDR circuit is generally quite low, making it suitable for battery-powered or energy-efficient projects. However, it’s important to optimize your code and hardware design to minimize power consumption further.
- Can LDRs be used in conjunction with other sensors for more complex projects?
Absolutely! LDRs can be combined with various other sensors, such as temperature, humidity, or motion sensors, to create more sophisticated and integrated projects that respond to multiple environmental factors.
- Are there any safety considerations when working with LDRs?
LDRs themselves are generally safe to work with, as they operate at low voltages and currents. However, it’s essential to follow proper electrical safety practices when working with electronics and circuits, such as avoiding short circuits and ensuring proper insulation.
- Can LDRs be used in industrial or commercial applications?
While LDRs are often associated with hobbyist and DIY projects, they can also be used in industrial or commercial applications, such as automated lighting systems, security systems, or process monitoring and control.
- Are there any alternatives to LDRs for light sensing applications?
There are several alternatives to LDRs for light sensing, including photodiodes, phototransistors, and specialized light sensors. The choice depends on factors like sensitivity, response time, and specific application requirements.
- How long do LDRs typically last?
LDRs are generally durable and have a long lifespan if used within their specified operating conditions. However, prolonged exposure to high temperatures, humidity, or intense light levels can degrade their performance over time.
- Can LDRs be used for detecting infrared or ultraviolet light?
While LDRs are primarily sensitive to visible light, some specialized variants may be designed to detect infrared or ultraviolet light. However, for most applications involving these wavelengths, dedicated infrared or UV sensors may be more suitable.
- What are some common troubleshooting steps for LDR-based projects?
Common troubleshooting steps for LDR-based projects include checking for proper wiring and connections, verifying the code for any logical errors, ensuring proper power supply, and testing the LDR with known light levels to identify potential hardware issues.
- Can LDRs be used in wearable or portable devices?
Yes, LDRs can be integrated into wearable or portable devices, such as smartwatches or fitness trackers, to enable light-based features or ambient light monitoring. Their small size and low power consumption make them well-suited for such applications.
- How does the temperature affect the performance of LDRs?
Temperature can impact the performance of LDRs, as their resistance can vary slightly with changes in temperature. This effect is typically minor but should be accounted for in applications where precise light measurements are required.
- Can LDRs be used for detecting rapid changes in light intensity?
While LDRs are generally responsive to changes in light intensity, their response time may not be suitable for detecting extremely rapid changes, such as those found in high-speed applications or certain industrial processes. In such cases, faster light sensors may be required.
- Are there any limitations to the light intensity range that LDRs can measure?
LDRs have a finite operating range and may saturate or become insensitive at extremely high or low light intensities. The specific operating range can vary between different LDR models and should be considered when designing projects with extreme light conditions.
- Can LDRs be used in underwater applications?
While LDRs can theoretically be used in underwater applications, they would need to be properly encapsulated and waterproofed to prevent water damage. Additionally, the refraction and absorption of light in water may affect the sensor’s performance and require calibration or specialized underwater light sensors.