
TeslaMate is an open source tool designed to provide Tesla owners with additional visualization and insights about their electric vehicle. With features like trip statistics, location tracking, and efficiency scores, TeslaMate enables deeper analysis of driving habits and usage patterns. Thanks to its open source nature, TeslaMate can run on a wide variety of hardware platforms – including the affordable and compact Raspberry Pi.
Hardware Considerations for Running TeslaMate
The Raspberry Pi is fully capable of handling TeslaMate, but hardware selection still deserves careful consideration. Aspects like Pi model, memory, and storage can impact performance.
Models and Processing Power
While older Raspberry Pi models like the Pi 3 are supported, a Pi 4 is recommended for the best TeslaMate experience. The additional processing power ensures smooth data processing and rendering. Those relying on features like the driving visualization map will especially benefit.
Memory is another constraint. Aim for 4GB RAM at a minimum, with 8GB being ideal if using features like the Grafana dashboard extensively. Storage is less of a concern thanks to TeslaMate’s relatively low disk space demands, but using a MicroSD card rated Class 10 or faster avoids IO bottlenecks.
Power Supply and Enclosure
Don’t overlook the power supply and enclosure for a Raspberry Pi TeslaMate setup. A quality 3 amp+ power adapter provides reliable, consistent power to the Pi device. And a case improves airflow and keeps the board securely housed, especially for in-vehicle use while driving.
Software Configuration Steps
With capable hardware in place, configuring the software is straightforward thanks to TeslaMate’s setup scripts and installation wizards.
Downloading and Installing Raspbian OS
Start by imaging the Raspberry Pi OS (previously called Raspbian) onto a MicroSD card. The standard Raspbian image works well thanks to its Debian base that provides good compatibility with TeslaMate dependencies.
Use the official Raspberry Pi Imager tool for all operating system downloads and MicroSD card imaging. With the latest OS image loaded onto the card, insert it into the Pi and proceed with first boot initialization.
Enabling SSH and Connecting
SSH access allows controlling the Pi headlessly over a network. Enable SSH on first boot or via sudo raspi-config. With SSH enabled, note the Pi’s local IP address and connect remotely using any SSH client.
For example, from the terminal on macOS or Linux:
Or using PuTTY from Windows. This grants command line access to install and configure.
Running the TeslaMate Installer Script
With an SSH session active, download and execute TeslaMate’s install script:
curl -s https://raw.githubusercontent.com/adriankumpf/teslamate/stable/install-teslamate.sh | bash -s
The script handles all dependencies like Docker, runs updates, and configures enabled services. Follow the on-screen prompts to configure aspects like web authentication passwords as it installs.
After about 5-10 minutes when installation completes, TeslaMate will be installed and its dashboard accessible at the Pi’s local network IP on port 4000 (e.g. http://192.168.1.123:4000).
Managing and Customizing the Docker Services
With TeslaMate fully installed, familiarize yourself with the backend services powering it built on Docker. Core containers like the TeslaMate web app, Grafana dashboards, and MQTT message broker run as background services.
Docker containers can be managed by commands like:
docker ps
List running containers
docker stop [name]
Stop a container
docker start [name]
Start a stopped container
Tweaking Docker container configurations allow customizing aspects like exposed ports or mapped data volumes. Edit files found in /etc/teslamate/docker once familiar with running containers.
For example, mapping additional storage mounts for keeping device backups or modified configs that persist across container updates.
Securing Access to the TeslaMate Dashboard
Publicly exposing the TeslaMate dashboard online without any authentication risks open access. Some sensible security steps help lock it down.
Password Protecting Grafana
Add password protection to Grafana by enabling it in /etc/teslamate/grafana/config.ini then restarting with:
docker restart Grafana
This prompts on login for a username and password set during TeslaMate’s initial installation.
Disabling Web Authentication
In addition to locking down Grafana itself, consider disabling the default web authentication popup. Web authentication protects the dashboard with a username/password login, but is not necessary when Grafana passwords are already set.
Disable web authentication by editing /etc/teslamate/docker/nginx/.htpasswd and removing its contents. Save the blank file and restart:
docker restart reverse-proxy
Now only Grafana will prompt for authentication.
Using SSL for Encrypted Connections
Without SSL configured, Grafana credentials and dashboard data exchange occurs unencrypted. Set up SSL certificates to enable HTTPS connectivity and secure the web traffic flows.
Start by obtaining SSL certificate files from a trusted Certificate Authority. Self-signed certificates work as well for encrypting the traffic itself, albeit without providing domain validation capabilities typically expected from CA-issued SSL certs.
Expanding Features with Additional Data Sources
Part of the beauty of TeslaMate is its flexibility to incorporate data from sources well beyond the vehicle itself. This expands capabilities for broader insights.
Popular additions like integrating weather data or energy rates enrich the dashboard’s context and analysis abilities even further.
Importing Rich Weather Data
Local weather conditions influence factors like driving efficiency and battery usage. Connect TeslaMate with curated weather information using services like OpenWeatherMap for context-aware analysis.
Create a free OpenWeatherMap account to obtain an API key. Then configure an additional data source in Grafana using the OpenWeatherMap plugin. Pass your API key and desired location either via city name or geographic coordinates.
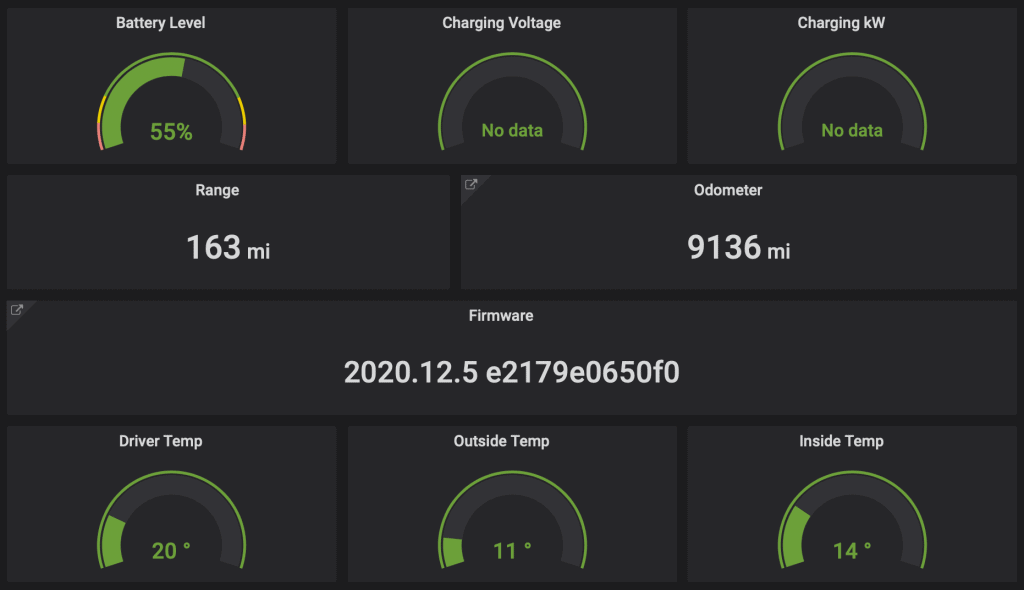
Granular weather details now populate the Grafana dashboard panels with interactive graphs on attributes like temperature, humidity, wind speeds and more.
Incorporating Time-Based Electricity Rates
Understanding costs also means understanding rates, which for electric vehicles, fluctuates over time. Integrate dynamic hourly electricity pricing information as another data dimension within TeslaMate’s calculations.
Sources like the US Energy Information Administration provide public APIs delivering retail and wholesale rate data. Set up a second data source targeting the relevant EIA API endpoint, allowing context-aware cost per mile evaluations.
Maintaining Reliable Operations Long-Term
Like any server-based setup, attentiveness goes a long way for sustainable long term operations. As a Docker environment, occasional restarts help clear accumulated memory. Regular package updates bring in latest fixes and features as well.
Restarting Containers Periodically
Be sure to restart the TeslaMate Docker containers every so often to clear memory build up:
docker restart $(docker ps -q)
Restarting once a week works well for most use cases. Set a cron job or systemd timer to automate container restarts on a schedule.
Updating to the Latest TeslaMate Releases
Since TeslaMate improves steadily, stay on top of new versions:
curl -s https://raw.githubusercontent.com/adriankumpf/teslamate/stable/update-teslamate.sh | bash -s
Review the release notes to understand the changes introduced in each version. Updating every 1-2 months is reasonable to take advantage of the latest capabilities and fixes as they ship.
Key Takeaways
- The Raspberry Pi’s compact form factor makes an affordable and capable option for running the TeslaMate tool. Select a recent Pi 4 model with ample RAM and storage for the best experience.
- Carefully configure SSH access, enable security provisions like SSL encryption, and password protect access to lock down the dashboard against unwanted intrusion risks.
- Consider expanding features and customizing data sources by tapping into additional APIs. Curated information like weather data and energy pricing enhances insights and analysis abilities.
- Reliable long term operations relies on periodic restarts to clear memory buildup and consistent updating to leverage latest releases. Automate both restart cadence and TeslaMate version upgrades.
Conclusion
Installing the powerful TeslaMate automation tool need not require expensive hardware or dedicated servers. The versatile Raspberry Pi offers an approachable way for EV owners to unlock rich insights on driving and charging habits.
Factor in key hardware considerations like Raspberry Pi model, memory, storage, power supply, and enclosure to deliver solid performance. Software-wise, follow TeslaMate’s guided installation process leveraging streamlined Docker containers for each backend component.
Keep security top of mind by password protecting access and enabling SSL encryption for the Grafana dashboard. And explore augmenting default data sources with added APIs delivering supplemental weather or energy pricing information. Lastly, nurture sustainable operations through periodic restart maintenance and consistent version updates over time.
The open extensibility at TeslaMate’s core means the possibilities stretch far beyond just the out-of-box experience. Whether as a plug-and-play dashboard, or a foundation enabling deeper analytics integrations, Raspberry Pi TeslaMate stands out as an exceptional community-driven showcase of smart EV technology done right.
Frequently Asked Questions
- What is the recommended Raspberry Pi model for running TeslaMate?
The Raspberry Pi 4 Model B with 4 or 8 GB RAM is recommended for the best TeslaMate performance. - What MicroSD card speed rating is needed?
Aim for Class 10 card or faster to avoid IO bottlenecks. - What Linux OS should be installed for the Raspberry Pi TeslaMate setup?
The official Raspberry Pi OS image (formerly called Raspbian) works great. - Can older Pi models like the Pi 3 handle TeslaMate?
Yes, but performance may suffer, especially with more extensive data flows or multiple vehicles. - What SSH client can connect to the Pi?
Any SSH tool like PuTTY on Windows or the ssh command on Linux/macOS works fine. - How do I restart the TeslaMate Docker containers?
Use docker restart $(docker ps -q) to cleanly restart all containers. - What port exposes the TeslaMate Grafana dashboard by default?
Port 4000, so accessing http://your-pi-ip:4000 opens the dashboard. - Can multiple vehicles be tracked with TeslaMate on a Pi?
Yes, though this increases resource demands. Additional vehicles require separate MQTT broker configurations. - Where is the NGINX reverse proxy configuration located?
In /etc/teslamate/docker/nginx – edit files here to tweak proxy behavior. - Do self-signed SSL certificates work for encrypting traffic?
Yes, self-signed provides the encryption mechanism itself. But lacks the domain trust assurance of paid commercial SSL certs. - Can variables like battery partial charge/discharge state be tracked?
Yes, the dashboard displays granular battery state metrics including segmentation by cell group voltages. - How often should TeslaMate be restarted?
Weekly restarts are recommended. Set a cron job or systemd timer to automate the cadence. - Does the Raspberry Pi TeslaMate setup sync data to the Tesla cloud?
Currently no – it is a standalone system not integrating with Tesla’s backend. Only data pushed from the vehicle API itself is consumed. - Can I enable access to the TeslaMate dashboard from the public internet?
This is possible via port forwarding, but not recommended without additional security precautions due to risks of data exposure or system compromise. - What log files should be checked for debugging issues?
Review logs in /var/log/teslamate and logs of the specific Docker containers having problems. - How do I migrate TeslaMate data from one Pi to another?
Data lives on mapped Docker volumes found in /etc/teslamate. Copy this entire folder to retain settings and data. - Can video footage from integrated dashcams be streamed to TeslaMate?
Not presently, but surrounding cameras could potentially interface providing additional telemetry meta-data. - Is there an option for TeslaMate to speak driving statistics audibly?
No text-to-speech features exist currently, but the open source nature allows custom integrations.